Adding a Stripe Checkout button to your LeadSanity is very simple, but you do need to follow this tutorial.
Intuition may temp you to believe that all you need to do is grab the code from Stripe that looks like this:
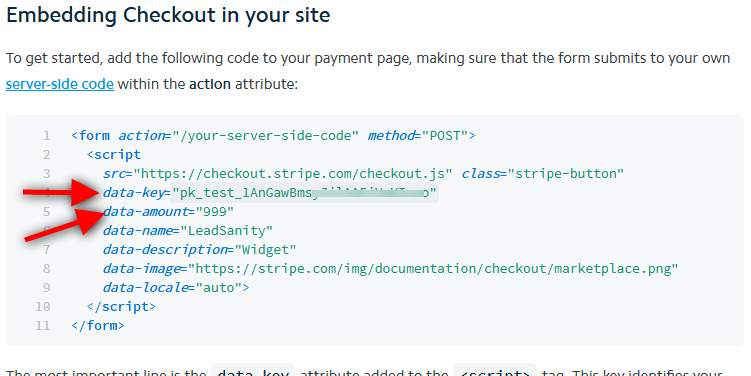
<form action="/your-server-side-code" method="POST">
  <script
    src="https://checkout.stripe.com/checkout.js" class="stripe-button"
    data-key="pk_test_xxxxxxxxxxxxxxxxxxx"
    data-amount="999"
    data-name="LeadSanity"
    data-description="Widget"
    data-image="https://stripe.com/img/documentation/checkout/marketplace.png"
    data-locale="auto">
  </script>
</form>
and then use the HTML/CSS/Javascript element in LeadSanity’s builder to paste it. Well, it’s not quite as simple, but it’s simple enough for anybody to do.
So, the first thing you want to do is log into your Stripe account. Then go to this page https://stripe.com/docs/checkout/tutorial
At about midway point on the page you will see a section titled “Embedding Checkout in your site”. You will need that code, but you will only need a few small parts of it. The fact that you are logged into your Stripe account ensures that the code actually contains your data-key. You will need that value. It will look something like this for the test key: pk_test_1AnGawBmsdjiklAFiVaVIczo and something like this for live key: pk_live_1JHGawBmsyJilAAFiVaVIdjh.
Keep in mind that by default Stripe will give you the test key so you can run a few test transactions. Later, when you are ready to go live, you will have to log into your Stripe account and grab your live key in the API section here https://dashboard.stripe.com/account/apikeys
So here are the values you need to copy from the code:
You will need to copy and paste those values into the following code:
<form style="text-align:center;" action="." method="post">
 <input id="stripe-pmnt-btn" class="ib2-button" style="color: rgb(255, 255, 255); background-color: rgb(45, 103, 153); border-color: rgb(17, 75, 125); border-radius: 5px; text-shadow: rgb(74, 74, 74) 1px 1px 0px; background-image: none; font-size: 26px;" type="submit"
 value="Pay with Card"
 data-key="pk_test_7hdsjhGCoBOKtIshFeQd4XMUh"
 data-amount="500"
 data-currency="usd"
 data-name="Example Company Inc"
 data-description="Stripe payment for $5">

<script src="https://checkout.stripe.com/v2/checkout.js"></script>
 <script>
 jQuery(document).ready(function(){jQuery("#stripe-pmnt-btn").on("click",function(e){e.preventDefault();var t=jQuery(this),n=t.parents("form"),r=jQuery.extend({},t.data(),{token:function(e){n.append(jQuery("<input>").attr({type:"hidden",name:"stripeToken",value:e.id})).submit()}});StripeCheckout.open(r)})});
 </script>
</form>
The part that reads:
value="Pay with Card"
 data-key="pk_test_7hdsjhGCoBOKtIshFeQd4XMUh"
 data-amount="500"
 data-currency="usd"
 data-name="Example Company Inc"
 data-description="Stripe payment for $5"
is for you to modify, but the most important values are data-key and data-amount. data-amount tells Stripe the amount to charge. I would also change data-name to your company’s name and perhaps modify data-description to reflect whatever you want your buyers to see. The value attribute will determine what the button says. You can, for example, have it say “Pay Now” or something like that. The data-key attribute should be updated to whatever you copied in the above step, which will be your Stripe key.
Once you update the above values to whatever you need, you will have to place the code into your LeadSanity builder. Here is how to do that…
In your LeadSanity builder, drag the following element onto your page, to the exact place where you want your Stripe button to appear.

Once the element is on the page, click on it and then click on the gear icon to modify it.
![]()
Paste the code you just created in the previous step into the text area. Publish/Save page and you are all set.

Check out this test page here.